Tuesday, July 22, 2014

How to debone a milkfish (bangus)?

Bangus or milkfish is the national fish of the Philippines. It has firm meat but has more bones than the other edible fishes. The sizes range from 4 inches to 1 meter in the market. The bigger fishes are called "Sabalo" or Mother bangus and are prohibited from being taken because they are the ones that spawn. The sizes that can be seen in the markets are up to 15 inches at the most. The bangus is fresh if the eyes are very clear, the scales do not easily separate from the skin, the gills are very red and the meat is very firm with no off smell.

It is very common here in the Philippines to find boneless bangus in both the supermarket and wet market because the people like to eat the fish not worrying about the bones getting stuck in the throat. It is quite easy to debone a bangus once you get the hang of it. All you have to have is a very sharp knife and surgical forceps, I used mosquito (I believe) forceps, the size I don't know but buy a small thin ones. The first time I tried deboning a bangus, I had a hard time and it was evident that I was not yet very good at it because not a lot of meat remained in the fish, almost all got stuck in the bones. The more practice you do, the more perfect your fish will come out. So let's begin!

Instruction:

To debone a bangus the cut must be made in the dorsal side of the fish or the upper part. Let the dorsal fin be your guide in cutting. Pierce the skin of the bangus on the side of the dorsal fin using your very sharp knife. Make sure that the blade cuts as close as possible to the back bone to get the most out of the meat of the fish. Run through the back bone and split the head in the middle. Do not cut through the ribs and the tail. Do the same way on the other side.
 Carefully detach the backbone from the head of the fish. Slowly pull the backbone including the ribs from the body of the fish.

Remove the gills and innards of the fish.

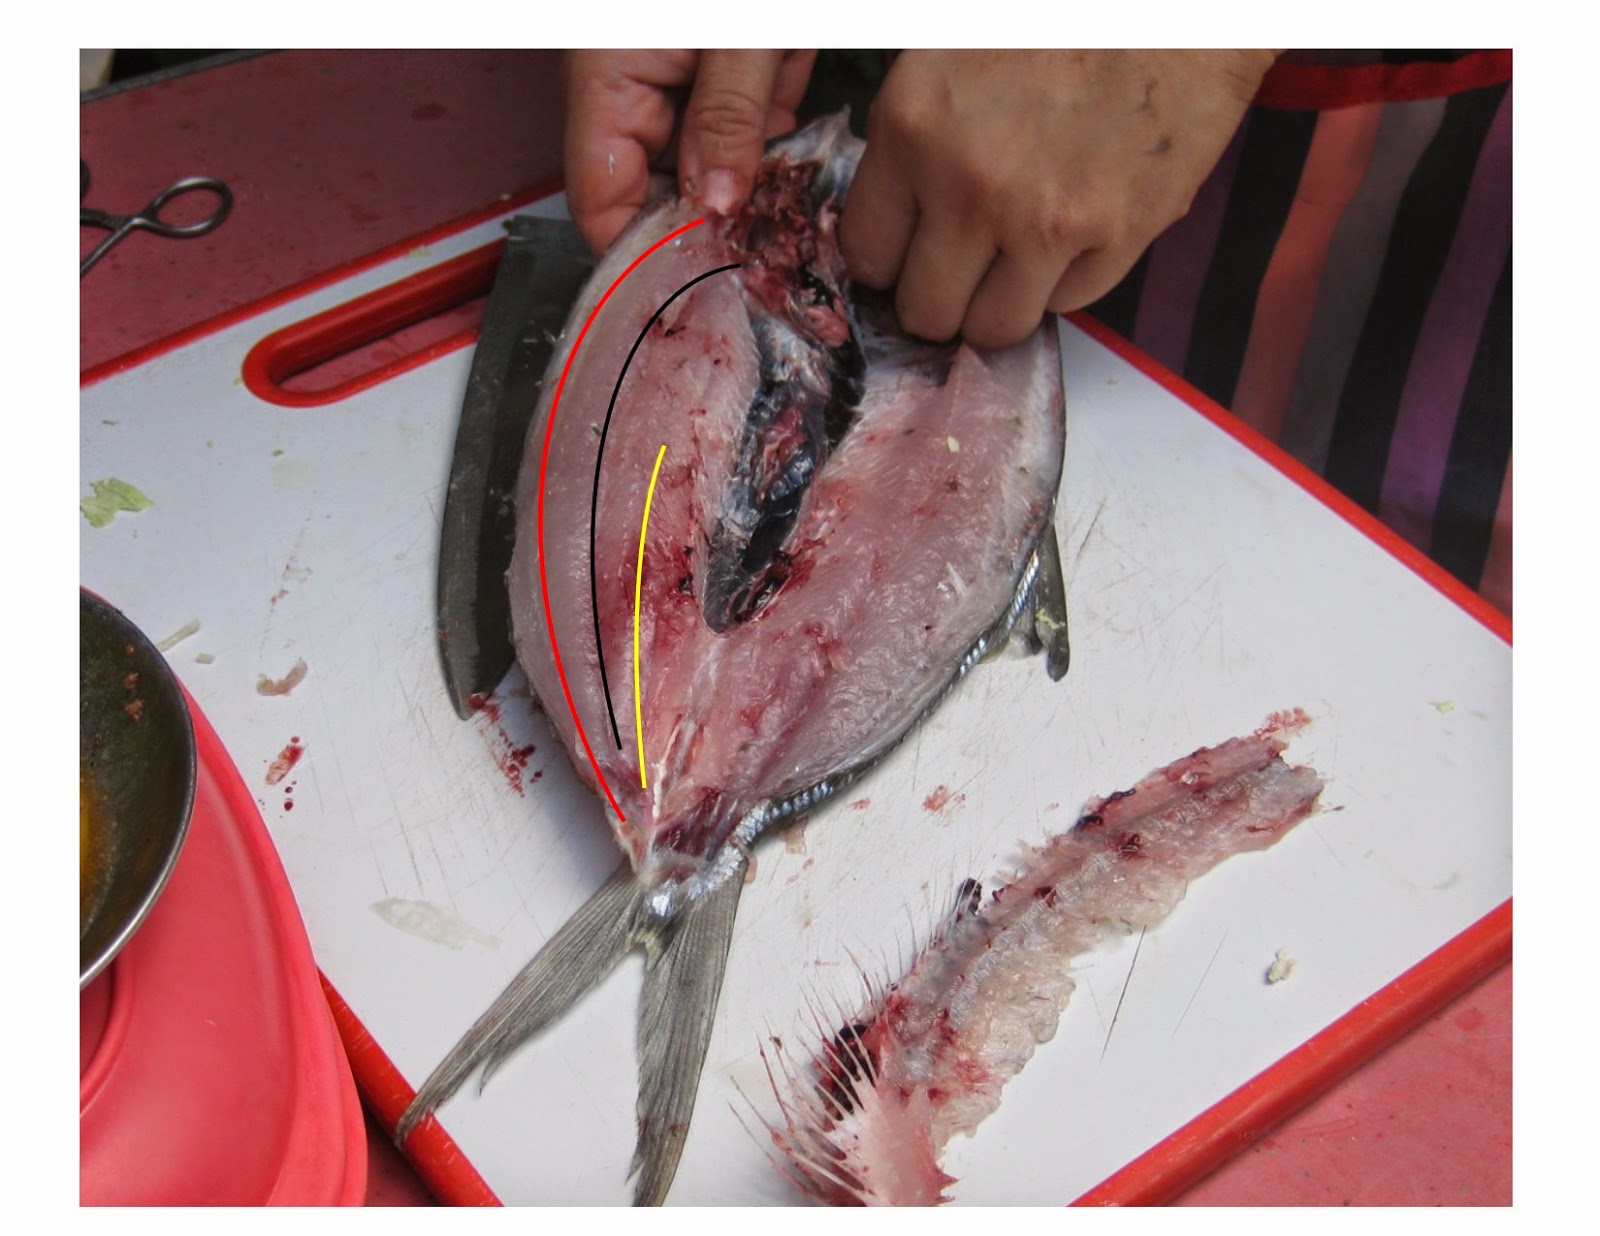
The small bones in the bangus seem complicated if you are eating it but actually has a systematic pattern. The black line has the fewest bones having a series of single strand bones attached were the ribs were. The yellow line has a series of single strand bones thick the the ones in the middle. The red line contains the most bones there is. Before you start taking off bones from the meat, I suggest that you run the tip of your knife along the lines to help ease out the bones but do not cut through the bones because if you do you might not be able to see them and get them removed. You will see a faint line across the meat of the fish approximately where I put the lines in the pic. These lines will guide your where yo run the blade of your knife.


Insert the tip of your forceps in the line that you made. Carefully ease out and pull out the meat. If you are just starting to do this, it is important to hold on the meat to prevent the meat from coming out with the bones. If you do not do this, there will not be much meat left in the bangus.


After your done with the deboning process, you can now put the spices that you desire.

For "Daing na Bangus", just drizzle it with vinegar. Put crushed garlic, salt and ground black pepper. Marinade more at least 2 hours. Keep in the freezer until your ready to fry it!


Monday, July 21, 2014

Sweetened Wintermelon or Kundol

As I was wondering in the market one afternoon, thinking hard what to buy for dinner, I came to a shop and immediately saw something I have not seen for quite sometime. I saw wintermelons or what we call kundol, locally. I immediately bought one and went home excited for what I can make out of it.

Wintermelon is a relative of cucumbers, melons, etc (http://en.wikipedia.org/wiki/Winter_melon). It has hard and fuzzy (covered with hairs) green skin. It has white meat and seeds in the middle. There are a lot of things that can be done with wintermelons. It can be cooked in stews and soups. In Taiwan, they have the wintermelon tea. It can also be made into candies. The only thing I want to make is cooked in syrup.

Ingredients:

1 winter melon
sugar (1kg of sugar to 1 kg of wintermelon)
20 g Lime or apog to 1 kg wintermelon

Cut the wintermelon into bite size pieces. In a plastic container, put enough water to submerge the wintermelon pieces and put the lime in the water. Put a lid on it and soak for about 24 hours.

After 24 hours, rinse the wintermelon thoroughly until the water runs clear. Drain using a colander and set aside until the pieces loses some of the moisture.

In a pot or pan, put the wintermelon and put the sugar. Mix and leave for about 30 minutes before cooking. Put the pan in the stove and turn on the heat. I did not put water in it because I know that there is still water in the wintermelon. The heat and sugar will draw out the water.

Let the syrup boil until all sugar has dissolve. The wintermelon is cooked after 20 mins or so or until the pieces turn a little bit translucent.

Let it cool and store in the refrigerator. Serve with rice cake or as dessert.


Winter melon still in vine (picture source http://i01.i.aliimg.com/img/pb/586/566/470/470566586_666.jpg)

I already peeled the skin before I remembered to take the pics

Sliced into bite size

I used a wavy cutter

Lime (calcium hydroxide) or apog


Wintermelon in syrup


Thursday, July 17, 2014

Hot and Sour soup!

There is nothing like a hot, warm soup on a rainy day! Coming home from work during the typhoon Glenda made want to cook a big batch of soup. I was thinking about tom yum at first but then I lack some of the ingredients in it. So I decided to make hot and sour soup instead.

Hot and sour soup is a Szechuan style soup. It's broth has black vinegar, for the sourness, and hot pepper, for the hotness. There are some recipe of this soup that calls for blood cubes but I omitted it since some do not eat it. To thicken the soup, you may use camote/cassava flour to make it really thick. But I used cornstarch since it was the only one available in my pantry. The downside in using cornstarch is that when the soup cools downs, it loses the "thickness" of the soup.

The soup has a bamboo shoots, seaweeds, black mushrooms, wood ear fungi (tenga ng daga), tofu and meat which makes it very hearty. A meal in itself!

Ingredients:
6 cups of water
1 cup bamboo shoots, sliced
5 small blocks of firm tofu or 1 big block, sliced into strips
1 Tbsp of black vinegar
1 Tbsp of soy sauce
1 bouillon, pork or chicken
1 tsp sugar
1 onion, minced
3 cloves garlic, minced
1 Tbsp ginger, minced
5 pieces dried chili, adjust to your desired level of hotness
1 cup seaweed, sliced if using kelp
200 g meat, groundpork or porkloin or chicken
salt and pepper to taste

Dried Chili

Pre-cooked, softened black mushrooms.

tofu

Frozen bamboo shoot

Faat coi. Hair-like seaweed. It is very rare and naturally black in color. If you were a able to buy this stuff, to test if it's authentic, soak in water if it turns red, it is fake!
In a pot, bring to boil the water then put the garlic, onion, ginger, vinegar, soy sauce and bouillon. Do not stir until it boils so as to "cook" the vinegar. Put the bamboo shoots, mushrooms, seaweed and chili.

In a separate pan, heat a tablespoon of oil and then cook the meat until a little brown then transfer to the pot of soup. Put the tofu. And let it boil.

Disperse 3 Tbsp of cornstarch in a small amount of water. Pour in the soup, stirring at the same time to thicken it evenly! Add salt and pepper to taste. Sprinkle with chopped green onion and parsley. Serve hot!!

Tuesday, July 15, 2014

"Buko-less" Buko pandan/lychee salad

I craved for something sweet and the first thing that came into my mind is buko salad. Since I was on a very tight budget, fruit cocktail is out of the picture. So I opted to make Buko Pandan salad. We have a coconut tree but it was raining because of Glenda so getting coconut was not an option because the trunk would be very slippery it would be dangerous to get the coconuts. But since I was stingy nowadays I decided to improvise on the Buko! I went to a Save More nearby to buy my ingredients. Cream, condensed milk, gelatin, etc! When I got home, it seemed that the Bagger only put a pack of the Pandan flavored gelatin in my bag instead of 2. Arrgh! Luckily I also bought Lychee flavored gelatins so the Buko Pandan became Buko Lychee!

I used unflavored white gelatin for the mock young coconut meat. I dissolved it in half of the recommended water to make the finished gelatin very firm. I put a cup of coconut milk just before the mixture boils. The coconut milk will give the flavor to the gelatin. And is what I used instead of the real coconut meat!

Ingredients:
2 packs unflavored white gelatin, I used the brand Mr. Gulaman
2 packs Pandan or Lychee flavored gelatin
2 Nestle all-purpose cream in tetra pack, chilled
1 can condensed milk
1 cup coconut milk

Cook the gelatin according to instructions but change the amount of water in dissolving the gelatin. For the unflavored gelatin, use only half of the recommended amount of water. For the Lychee gelatin, used the recommended amount of water. Mix the coconut milk in the unflavored gelatin just before it boils then remove from heat and let it cool to set. You can add a small amount of sugar in the gelatin but remember that the cream will also be sweet, you don't want your salad to taste too sweet.

When the gelatin are set, cut the Lychee gelatin into cubes. For the coconut gelatin, use a large bore grater. Grate the gelatin and mix with the Lychee flavored.


The coconut gelatin when grated will look and taste like grated coconut meat!


Mix the all-purpose cream and condensed milk and pour on the gelatin. Mix and put more sugar if you think its not sweet enough. Chill overnight before serving.


Wednesday, July 9, 2014

Bangus en Tocho!

The rainy days are here and a lot of dishes are best eaten on these days. Arrozcaldo, soups, etc. One of the dishes best eaten on rainy days is Tocho. I am not sure why since it is not a soup. I don't know if it's just me but I enjoy eating it more on rainy days with garlic fried rice!

Bangus en Tocho, the recipe I have learned from my mother in law, is an old Filipino dish that has fermented bean curd (tajure) and black beans (although I didn't put black beans in this one). I never saw other fishes prepared this way but I tried galunggong before and it was good also. My mother in law also prepared beef or horse ribs this way but she called the dish "Talunan". So if you also want to try it on meat, you may do so.

Fermented bean curd can be bought in some markets but if you don't see it in one near you, you can make your own. It is very easy to prepare. Just buy a couple of small blocks of firm tofu and just marinade it in soy sauce and black bean for a week or so, turning constantly so that the whole block will ferment evenly. There are also fermented bean curds available in stores that sell Chinese products but they are prepared differently so they might taste different from the one I use so I do not recommend them.

It is important to fry the bangus pieces so that they will not be ruined when simmered. I removed the bones of the bangus since my family do not like to eat bangus with bones.

This dish tastes better when eaten 1-2 days after cooking so prepare it in advance.

Ingredients:
2 large bangus or 3 medium bangus, cut into serving sizes
2 blocks tajure, mashed
2 Tbsp ginger, minced
1 bulb garlic, sliced
1/4 cup vinegar
patis, to taste
groun black pepper
1 tsp sugar
oil for frying

Fry the bangus until the outer crust is formed. Set aside.

Heat 1 Tbsp of oil in pan. Saute the garlic and ginger. Put the mashed tajure, pour the vinegar but do not mix. Let it boil first to cook the vinegar then add 2 cups of water and sugar. Let it boil.

Put the bangus pieces and simmer for 2 minutes. Adjust the taste by adding patis. Add ground black pepper. Remove form heat after a minute. Serve immediately or you can store it in the refrigerator and reheat after 1-2 days.


Home-made fermented bean curd

Not fully fermented yet

Garlic and ginger sliced thinly

Bangus en Tocho

Sunday, July 6, 2014

Stir-fried Chicken and Tofu

The costs of meat nowadays are astronomical! To plan meals weekly is just a burden when there is the need to stick to a very tight budget. To think of ways on how to cook a dish with cheap ingredients is an acquired skill for a mother like me. The most important thing is to make the dish nutritious in spite of changing some of the ingredients. And for that reason, tofu has become a staple ingredient in almost all my dish. The downside, it can be hazardous to those who have problems in their uric acid levels.

The next recipe is inspired by Kung Pao Chicken. The spiciness distinct with Szechuan cuisine with the hint of tartness from black vinegar. Black vinegar is available in supermarkets. If you don't like spicy foods, you can skip the Szechuan pepper.

Ingredients:
1/2 kl chicken, sliced into bite size
10 block tofu (small) or 2 big blocks
100 g oyster mushrooms
100 g green beans
1 bamboo shoot, sliced
1 bell pepper, sliced into squares
1 onion, chopped
3 cloves garlic, chopped
1 tsp Szechuan pepper (if unavailable substitute dried pepper flakes)
1 Tbsp black vinegar
1 Tbsp dark soy sauce
1 Tbsp soy sauce
3 Tbsp brown sugar
2 Tbsp cornstarch, dispersed in small amount of water
salt and pepper

Black vinegar


Tofu blocks
Cut the tofu into bite-sized cubes and deep fry. Set aside.
Fried tofu
Slice the bamboo shoots into thin slices then cook in water with 1 tsp salt until tender. Drain and set aside.
Bamboo shoot

Outer layers of the bamboo shoot

The soft core of the bamboo shoot
Green beans

Oyster mushrooms
Fry the chicken pieces in hot oil. Make sure that all sides of the chicken pieces turn brown but do not cook them thoroughly. Remember, the chicken pieces will be cooked in the sauce.

Saute onion and garlic in the pan with 1 Tbsp of cooking oil. Put the vinegar, soy sauce and sugar. Add 4 cups of water. Let it boil.

Thicken the sauce with cornstarch. Stirring constantly to avoid clumps. Add all the ingredients, chicken, tofu, bamboo shoot, mushrooms, green beans and bell pepper. Simmer for 2 minutes. Since almost all ingredients are pre-cooked, there is no need to cook it longer. Green veggies retains most nutrients when not over-cooked!

Serve hot with steamed rice!


Meal wrapped in Bamboo leaves!

Chinese food has been one of the most regarded cuisines in the world. Like most cuisines, the dish may vary depending on the province in came from. My mother's family was from Fukien so most of the Chinese dishes I have eaten while growing up came from there. One of the food I constantly crave for is Ma Chang, a dimsum with sticky rice and meat wrapped in bamboo leaves.

It can be wrapped with banana leaves if you cannot find bamboo leaves but it will not smell the same. The dried bamboo leaves impart a distinct flavor to the sticky rice. It can be bought from grocery stores in Chunatown.

I used pork in this recipe but you can also use chicken. Another indispensable ingredient is the black mushroom. So don't ever skip that if you already skipped the bamboo leaves. This recipe is enough to make at least 10 pieces of medium size Ma Chang.

Ingredients:
1 kl pork with fat, cut into bite size
5 pcs black mushrooms (big), soaked in hot water, overnight
1 kl sticky rice or glutinous rice, soaked in water for 2 hours
1/4 cup soy sauce
1/2 cup dark soy sauce
1 onion, chopped
3 cloves garlic, chopped
black pepper

Saute the onion and garlic in oil. Put the pork and brown all sides. Pour the soy sauce and add water to cover the meat. Put the sliced black mushrooms next. Cook until tender.


Remove the pork into a separate container. Set aside. Use the sauce to cook the sticky rice.


Pour the uncooked sticky rice in the pot of sauce. And cook until the liquid is gone.


Soak the dried leaves for a couple of hours to make them flexible again.

Get 2-3 leaves and make a funnel. Put enough rice and a couple of pieces of meat and mushrooms. Fold the leaves to close it. Use white strings to secure the triangle.


Steam the Ma Chang for 45 minutes.

Serve hot and eat with catsup! (I know it's weird but it does taste good with it!)

You can store the Ma Chang in the refrigerator for up to 1 week. Just steam it again to reheat.